 Pin It
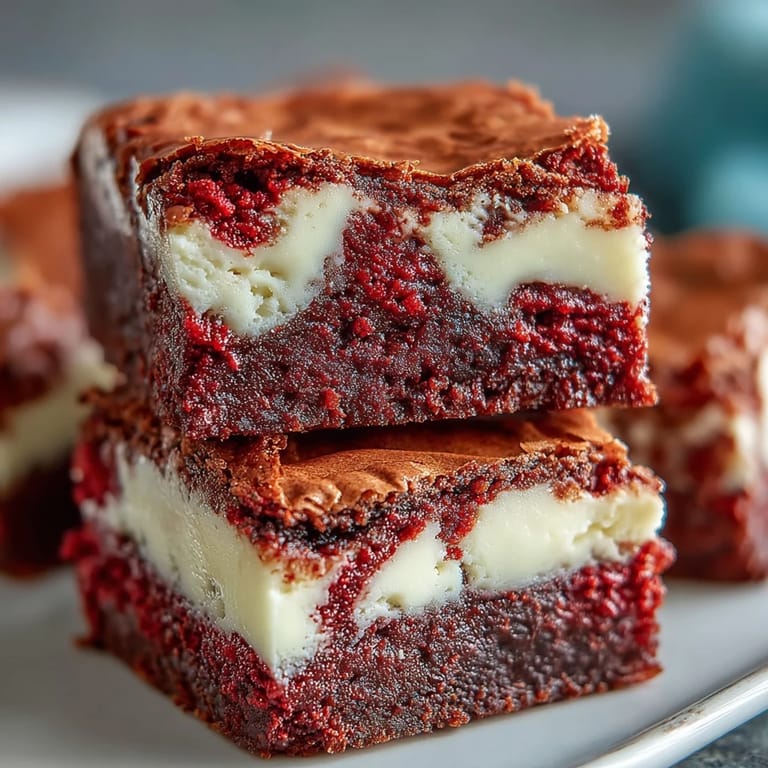
 My sister showed up one Valentine's Day with a pan of something that looked almost too pretty to eat. The swirls of crimson and cream caught the light like marble, and when I cut into them, the layers stayed distinct but somehow melted together on the tongue. She'd been experimenting all week, trying to merge two desserts without losing what made each one special. That first bite convinced me she'd cracked it.
I made these for a book club meeting in early spring, and three people asked for the recipe before we even started discussing the novel. One friend admitted she ate two squares standing at the kitchen counter while everyone else was still arriving. The conversation that night kept circling back to whether the red velvet or the cheesecake was the hero, and we never did reach a consensus.
Ingredients
- Unsalted butter: Melted butter gives you that dense, fudgy texture without making the brownies cakey, and using unsalted lets you control the saltiness.
- Granulated sugar: This sweetens both layers and helps create that shiny, crackly top on the brownie portion.
- Eggs: Room temperature eggs blend more smoothly into both batters, preventing lumps and ensuring even baking.
- Vanilla extract: A little vanilla in each layer deepens the chocolate and balances the tanginess of the cream cheese.
- Red food coloring: Gel coloring gives you vibrant color with less liquid, but liquid works fine if that's what you have on hand.
- All-purpose flour: Just enough to give structure without turning these into cake, so measure carefully and don't pack it down.
- Unsweetened cocoa powder: This adds the subtle chocolate backbone that makes red velvet taste like more than just colored cake.
- Cream cheese: Softened cream cheese blends into a silky layer without lumps, so let it sit out for at least thirty minutes before you start.
Tired of Takeout? 🥡
Get 10 meals you can make faster than delivery arrives. Seriously.
One email. No spam. Unsubscribe anytime.
Instructions
- Preheat and prep the pan:
- Set your oven to 175°C (350°F) and line your pan with parchment, letting the edges hang over the sides. Those overhangs become handles later, making it easy to lift the whole slab out without wrestling it.
- Mix the red velvet base:
- Whisk melted butter and sugar until they look glossy, then beat in eggs, vanilla, and food coloring until the batter turns that signature deep red. Sift in flour, cocoa, and salt, folding just until no white streaks remain because overmixing makes them tough.
- Reserve batter for swirling:
- Scoop out about a quarter cup of the red velvet batter into a small bowl and set it aside. Spread the rest evenly across the bottom of your prepared pan, smoothing it into the corners.
- Make the cheesecake layer:
- Beat softened cream cheese until it's completely smooth with no lumps, then add sugar, egg, and vanilla, mixing until the mixture looks like thick cream. Pour this over the red velvet base and spread it gently so you don't disturb the brownie layer underneath.
- Create the swirls:
- Drop spoonfuls of the reserved red velvet batter on top of the cheesecake, spacing them out randomly. Drag a knife or skewer through the dollops in lazy S shapes, pulling the red into the white without overdoing it.
- Bake until just set:
- Slide the pan into the oven and bake for thirty-five minutes, checking that the center barely jiggles and a toothpick comes out with moist crumbs but not wet batter. The cheesecake will firm up more as it cools, so don't wait for it to look completely solid.
- Cool and chill:
- Let the pan cool completely on a wire rack, then cover it and refrigerate for at least two hours. Cold brownies slice cleanly and the flavors meld together into something even better than when they first came out of the oven.
 Pin It
 My neighbor's daughter requested these for her sixteenth birthday instead of cake, and when I delivered the pan, her mom texted me a photo an hour later of the empty dish. Apparently, the birthday girl and her friends had devoured every square while watching movies, and someone had licked the parchment paper. That's when I knew these weren't just pretty, they were the kind of dessert people remember.
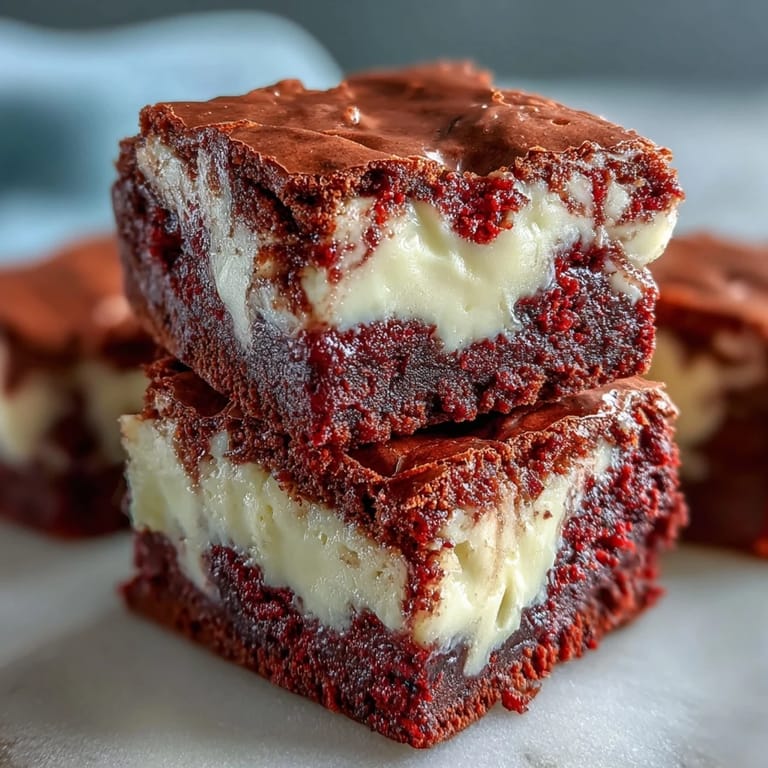
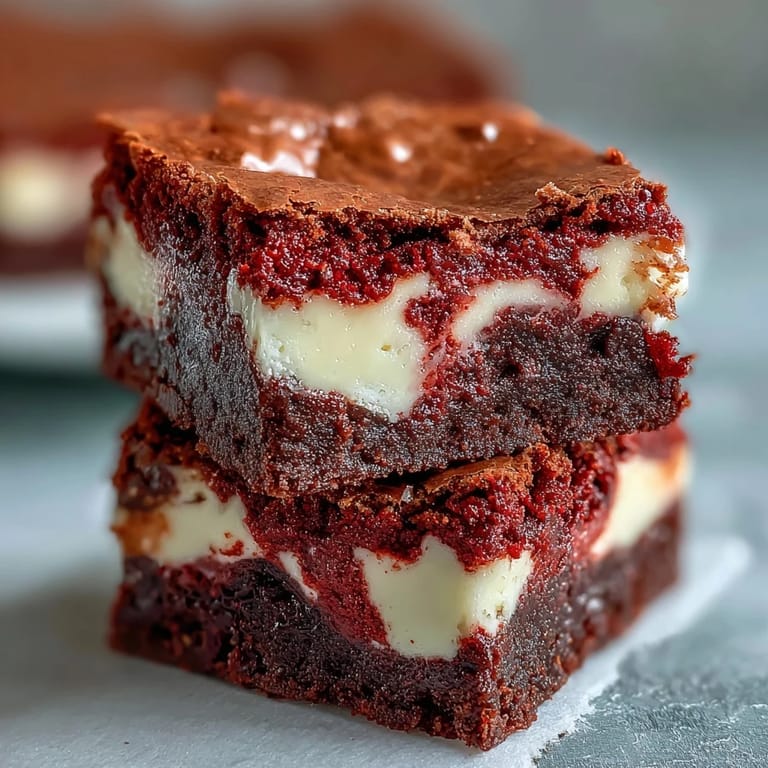
Getting the Perfect Swirl
The first time I made these, I swirled too enthusiastically and ended up with pink cheesecake instead of distinct ribbons. Now I drop the red batter in six or seven spots, then drag my knife through in one direction, turn the pan ninety degrees, and make two or three cuts the other way. The marbling looks deliberately artistic without requiring any actual skill, and every square ends up with a slightly different pattern.
Storing and Serving
These keep beautifully in the fridge for up to five days if you stack them between layers of parchment in an airtight container. I've found they actually taste better on day two when the flavors have had time to settle into each other. Let them sit at room temperature for about ten minutes before serving so the cheesecake layer softens just enough to be creamy instead of firm.
Make Them Your Own
I've stirred white chocolate chips into the brownie batter when I'm feeling extra indulgent, and once I added a handful of chopped raspberries to the cheesecake layer for a tart contrast. A friend of mine skips the food coloring entirely and makes them as regular chocolate cheesecake brownies, which her kids prefer because they don't get red fingers.
- Try sprinkling mini chocolate chips over the cheesecake before swirling for added texture.
- A teaspoon of espresso powder in the brownie batter deepens the chocolate flavor without making it taste like coffee.
- For holidays, use gel coloring in different shades like green for Christmas or pastel pink for Easter.
 Pin It
 These brownies have become my go-to whenever I need to bring something that looks like I spent all day in the kitchen but actually came together in under an hour. Every time I make them, someone asks if I bought them from a bakery, and I just smile and hand over the recipe.
Recipe FAQs
- → Can I use natural food coloring instead of artificial?
Yes, you can use natural red food coloring or beet powder, though the color may be less vibrant. Adjust the amount to achieve your desired shade.
- → Why is my cheesecake layer cracking?
Cracks can occur from overbaking or rapid temperature changes. Bake until just set, and let cool gradually at room temperature before refrigerating.
- → Can I make these ahead of time?
Absolutely! These brownies actually improve after chilling overnight. Store covered in the refrigerator for up to 5 days, or freeze for up to 3 months.
- → How do I get clean cuts?
Use a sharp knife warmed under hot water and wiped dry between each cut. Chilling the brownies thoroughly before cutting also helps achieve neat squares.
- → Can I double this batch?
Yes, double all ingredients and use a 23x33 cm (9x13-inch) pan. Baking time may increase by 5-10 minutes. Check for doneness with a toothpick.
- → What if I don't have cocoa powder?
Cocoa powder is essential for the red velvet flavor. You can use Dutch-processed or natural cocoa, though natural cocoa provides a slightly tangier taste.